Showing posts with label Danville lines. Show all posts

Friday, May 24, 2013

East Bay Gas Lines - How to Seal a Gas Line on a Dryer

Seal the dryer gas line pipe threads with gas-rated tape or pipe thread compound.


Once you get your new gas dryer home, you must safely connect it to the gas line. A dryer isn't hard to connect to a gas line, but if you don't do it correctly, it could be dangerous for your family and your home. Improperly connected gas lines to dryers, for instance, allow gas to leak inside the home. Gas buildup can result in an explosion when ignited, and the fumes are not safe to breathe. After connecting your gas line to your dryer, conduct an easy test to ensure it has a good seal and does not leak.

1 Measure the distance from the gas line to where the dryer will be installed. Use the measurement to size the flexible gas hose connection.

2 Match the flexible hose connection to the gas fitting in the house. Gas lines in newer homes are typically made from steel or black iron. Choose the flexible gas hose to match the gas line. For instance, for a steel or iron pipe, use a steel flexible gas line.

3 Clean the threads on the gas pipe that extends from the wall. Gently run the wire brush around the end of the pipe to remove any burrs or debris on the pipe threads. Wipe the threads with a clean soft rag.

4 Apply the gas-rated Teflon tape or pipe thread compound to the threaded end of the gas line in a clockwise direction.

5 Thread the flexible gas hose fitting onto the threads. Then tighten the fitting using the pipe wrench, but don't over tighten.

6 Repeat the thread-sealing procedure for the gas line that comes from the dryer.

7 Fill the water bottle halfway with a 1-to-1 mixture of detergent and water.

8 Turn the gas valve on. The gas valve is on the gas line that extends from the wall. When it is on, the handle is in line with the gas line. When it is off, it is perpendicular to the line.

9 Spray the connection on the gas line that extends from the wall where the flexible gas hose connects to it with the detergent and water mixture. Watch for bubbles to form. If no bubbles form, there are no leaks.

10 Move to the gas connection on the dryer side and repeat the procedure for checking for leaks. If no bubbles form, the gas dryer line is sealed between the gas line and the gas dryer.

Tip
Double-check the pipe tape or pipe thread compound package to ensure each is rated to seal gas lines.
Avoid purchasing a flexible hose that is too short or too long. You don't want the line to kink, twist or compress itself.

Use a soft rag that doesn't leave any fibers on the pipe threads, as these fibers could compromise the seal.
Avoid over tightening the fittings, as you don't want to break them. For homes fitted with copper flare fittings, use the detergent mixture to check all the connections for leaks before using your dryer.

Warning
If you don't have experience or are concerned with doing this project yourself, contact East Bay Gas Lines to hook up your dryer for you. 


by Laurie Reeves, Demand Media

http://www.eastbaygaslines.com

Friday, May 17, 2013

Unreliable Pilot Light - East Bay Gas Lines Danville


Question: Last winter, the pilot light on my gas furnace went out while I was traveling and my water pipes froze, resulting in thousands of dollars of damage. Can I replace the pilot with an electronic model that ignites automatically? And would this solve the problem?


Answer:  Many manufacturers have kits that will allow an HVAC contractor to convert a standing pilot light to an electronic spark-ignition system. The chief advantage of electronic ignition is lower fuel consumption and greater safety because there's no gas to leak if the pilot flame accidentally goes out.

But if your problem is low gas pressure, something I'm hearing more and more about lately, changing to a spark ignition wouldn't much matter. It will try to light the gas up to three times, depending on the type. But if there's not enough pressure, it won't operate.

All you can do is notify your gas utility so they can check on the problem. If inadequate pressure is indeed the culprit, then the company will have to fix its distribution network, and that could be a long time in coming.
source: http://www.thisoldhouse.com/toh/asktoh/question/0,,1075606,00.html
by Richard Threthewey


http://www.eastbaygaslines.com

Friday, May 3, 2013

East Bay Gas Lines - Home Inspections that Failed


This potato is being used as a cap for an active gas line. Note that it did try to sprout.

Dan Howard


a potato with roots sprouting out of it used as a gas line cap

Photo  Dan Howard


This homeowner decided he would fix his dripping temperature pressure relief valve one way or another. A simple replacement would have probably taken as long as it took to get this rigged solution to work.

Brian Mishler


a TPR valve tightened with a pair of locking pliers that are held in place with electrical tape
photo - Brian Mishler


This is an interesting example of someone who does not think gas combined with electric can hurt you.

Michael Legatt


gas and electrical lines all mixed up together
photo - Michael Legatt


source: http://www.thisoldhouse.com/toh/photos/0,,20206857_20470632,00.html

http://www.eastbaygaslines.com

Friday, April 19, 2013

East Bay Gas Lines - Furnace & gas line safety tips


A gas leak refers to the seeping of natural gas, frequently through a pipe, which can endanger the lives of those in the area. While the fumes may cause health problems, the larger problem is the potential for an explosion because natural gas is highly flammable.
1)      Have your furnace and gas lines checked every spring and fall.
2)      If you ever smell natural gas (it smells like rotten eggs) open the windows and call the gas company immediately (don’t assess it yourself).
3)      You may hear unusual noises coming from your gas lines.
4)      Don’t turn on lights or use a cell phone.
5)      Don’t ignite or light a lighter, smoke etc.
6)      Clear out—immediately—and warn others to do the same.
7)      Do not start a car or any nearby machinery.
8)      If you’re in a building with elevators—don’t use the elevator.
9)      Do not try to manage the situation on your own.
10)   From a safe place, call the gas company and 911.
If you have not had your furnace checkup during the fall, call us today to schedule one

by Larry Howald

Friday, April 12, 2013

East Bay Gas Lines Danville - Gas Grill Maintenance


Wolf Grill
Photo: Courtesy of Wolf Appliances


Nothing announces the arrival of summer like firing up the grill. Unfortunately, nothing sours a summer party faster than a grill that won't light, smokes too much, or cooks unevenly. Grease, marinades, and sauces wreak havoc on gas burners, while charcoal grills suffer the corrosive properties of charcoal.

Grills of all kinds, from simple kettles to stainless steel restaurant-grade infrared grills, require maintenance to ensure that they perform and last. "At least twice a year you need to pull the grill apart to get inside and take a closer look at it," says Derrick Riches, barbecue and grilling guide for About.com. A thorough cleaning ensures that the burners fire properly, heat distributes evenly, and the grill is safe. Regular maintenance also allows you to catch problems like rust early on. Here is a This Old House primer on keeping your grill in shape.

Inspect the Chassis: Grills with welded joints or connections with pop rivets can rust. Scrub rust off with a stiff wire brush or coarse steel wool, apply a rust-inhibiting primer, and paint the grill's exterior with rust-resistant metal paint. Keep fasteners tight to ensure the base is stable and safe. Replace damaged grill appendages, like wheels, handles, or any other part of your grill, by contacting the manufacturer. You can also refer to the 
CLA Grills and Service website, or the Appliance Factory Parts website. Use dish soap or a mild detergent to clean cast aluminum grills, and Simple Green all-purpose, biodegradable cleaner for stainless steel ones. 

Clean the Burners: Riches stresses that cleaning burners keeps the unit working at its best. Burner ports can fill with grease and close up, leading to hot and cold spots on the grill. While the unit is cold, use a stainless steel wire brush or flexible pipe cleaner to remove the gunk from a traditional gas burner. The flames should be distributed evenly throughout the burner after a good cleaning. Brush off any ash that accumulates on infrared grills, and be sure to keep the glass clean. Infrared grill manufacturers suggest using 
Bar Keepers Friend, a non-abrasive cleaner, to remove any deposits. Running the grill for 10 minutes on high after cooking also helps keep the ports free of build up.
Flame Color: There are a couple of reasons gas flames turn from their normal blue with yellow tips to completely yellow. The most common is inadequate gas pressure from the tank. Since propane expands at freezing temperatures, the pressure bladder in the regulator (a round disk attached to the gas line) can freeze into place and limit the flow of gas to the burner. If you have a yellow flame, try this remedy: First, turn the tank off and turn off the grill's control valves. Next, disconnect the tank, then open and close the control valves. Finally, reconnect the tank and slowly turn the gas back on to check the flame's color. Another cause of yellow flame is pressurized propane that, over time, can force the burner ports to widen. As a result, too much gas escapes. Riches recommends inspecting the burners and replacing them if they are misshapen or cracked. Once the burners are cleaned, light the grill to ensure that all flames are blue and similar in height.

Grease traps: Grill grease traps are typically trays or disposable aluminum cups beneath the firebox that collect fat. Keep these traps clean and drained because large pools of grease can ignite. Burners combined with a grease fire will exceed the maximum amount of heat the grill can handle.

Hoses: Replacing a worn or damaged fuel line is an easy task once you locate the problem. Manufacturers suggest coating everything—from the tank, to the venturi tubes, which connect the control valve to the burner—with soapy water. For a neat job, Riches uses a basting brush to apply the soap solution. Then, turn the grill on. Any bubbles that appear on coated areas indicate escaping gas, which can be fixed by replacing the hose or O-ring. The gap in the venturi tubes mixes gas with air enroute to the burner and can easily clog with debris or insects. Riches recommends wrapping the tubes with aluminum screen to let air in and keep bugs out.

Between the Burner and Grate: Sometimes called the radiant or flavorizer bar, this part of the grill evenly distributes heat to the grate above and produces smoke when food drippings seep down. "Most of the wear is in the flavorizer bars, because they see the most heat and grease," says Brooke Jones of Weber Grills. Brush off grease and debris from the metal plates because they can trap moisture and cause rusting. Replace lava rocks or ceramic briquettes if they give off a rancid flavor.

Grill Covers: Keeping a grill protected from the elements is the easiest way to preserve it. Covers should have a cloth inner lining to draw moisture away from the metal. A simple plastic sheet holds moisture in, creating a humid environment around the grill, which can lead to rusting. Use a canvas, cloth, or vinyl cover that fits the grill appropriately. Keep in mind that UV rays beak down cheaper, generic covers.
source: http://www.thisoldhouse.com/toh/article/0,,1638829,00.html
by Sal Vaglica

http://www.eastbaygaslines.com

Friday, March 29, 2013

East Bay Gas Lines Danville - 10 Tips for Maintaining Your Gas Fireplace


Gas fireplaces are great additions to any home; they look great and are more efficient than wood fireplaces; however they require regular maintenance. Gas fireplaces can be dangerous; therefore it is very important to take the maintenance seriously. This article will take a look at 10 tips for gas fireplace maintenance that will help keep you safe and your fireplace working efficiently. If you think there is any kind of problem with the gas fireplace have a professional take a look at it, ignoring problems can be dangerous and deadly.

1. Safety first

When attempting any maintenance or cleaning you should make sure the gas valve is turned off; if the valve is not turned off there is potential for injury or death.

2. Get the unit inspected

When dealing with a gas fireplace you do not want to take chances, if anything seems off about the unit you should call in a licensed gas technician to be on the safe side.

3. Does your gas fireplace have a working fan?

Not all gas fireplaces require the use of a fan; however some people install fans to spread the heat out throughout the room. If you happen to have a fan make sure to check if it is working properly, if it is not you are not getting the full benefit of the fireplace.

4. Ventilation system

The ventilation system is one of the most important things to check while doing routine maintenance on a gas fireplace. If there is any clogging or anything preventing the ventilation system from working properly it needs to be fixed immediately. If there is something clogging the ventilation system you could have a very unsafe fireplace that could cause injury or death.

5. Clean the glass on the door

About every 1-2 months you should clean the glass door to make sure there is no nasty build up or irregularities. Make sure to use a cleaner that the manufacturer deems safe for the gas fireplace. Most hardware stores and large home improvement stores sell special glass cleaner for gas fireplaces and can be found near the fireplace accessories.

6. Do you need to take the door off to clean it?

When cleaning the glass on the gas fireplace door you have two options, you can leave the door attached to the unit or remove it and clean it on a soft surface. If the gas fireplace is turned off and you feel comfortable cleaning it while still attached then you can clean it this way to save time and aggravation.

7. Have you checked the fake logs lately?

The logs that are used in gas fireplaces can become dirty and can even break on occasion. Make sure to inspect the logs on a monthly basis or at the first sign of unusual behavior; skipping this step could cause malfunction and possibly injury. When cleaning the fake logs make sure to use a soft bristle log cleaning brush, which can be picked up at most hardware stores.

8. Don't skip annual maintenance

Although annual maintenance for gas fireplaces is very expensive since it requires a licensed gas technician it is a good idea to not skip maintenance. If there is a leak or build up in the ventilation system you could be out a lot more money than the maintenance cost in damages. Many gas fireplace owners skip this step to save a few dollars; however skipping this step can cause malfunction and even injury.

9. Use recommended cleaners for cleaning logs, glass, and interior

I worked for a local hardware store for multiple years as a student job and know the prices of cleaners for gas fireplaces, some can be very high. Although the cleaners may be expensive you should not try your own solution unless it is recommended by the manufacturer; you could be voiding your warranty and damaging the unit. Do not cut corners!

10. The pilot light

The pilot light can be turned off during the spring and summer when the stove is not in use; it can also be easily turned back on during the months that the stove is in use. Always read the instruction manual before tampering with the pilot light.

Sources: http://voices.yahoo.com/10-tips-maintaining-gas-fireplace-4115875.html?cat=6
by Josh Mason


Friday, March 8, 2013

East Bay Gas Lines - Danville - How do I Know What Size Generator to Buy for My House?


A backup generator can provide power in the event of an outage for essential appliances such as refrigerators, freezers, sump and lift pumps and a few lights. Estimating the size of the generator required means adding up the total number of watts used by each appliance you intend to provide power in the event of an outage. This information is available on the appliance nameplates or in the documentation supplied with each appliance. The more appliances you include, the more that can be powered, but the cost increases as the size of the generator goes up.

1 Make a list of the appliances you wish to power during an outage. Include refrigerators, freezers, furnace, and electric range, along with well, sump, lift or ejector pumps. Include the number of watts each appliance requires for starting and running. Consult the appliance documentation or nameplate for this information, which is expressed as watts, kilowatts or volt-amps. Calculate power requirements by multiplying amps by voltage for appliances that do not list watts, kilowatts or volt-amps.

2 Determine starting power requirements for appliances with motors that do not list the starting power needed, such as refrigerators, air conditioners, washers and dryers. Contact the manufacturer of these appliances or consult a chart that gives average requirements for these appliances.

3 Total the running power requirements for appliances which do not have different starting and running loads, such as incandescent lights, water heaters and toasters. Total the starting power requirements for other appliances with motors, such as pumps and refrigerators. Add the two totals together for the total power required.

4 Choose between 240-volt and 120-volt generators; 240-volt generators will run electric stoves, electric baseboard heaters, electric dryers, central air conditioning units and dishwashers. Select a model the provides both the voltage and the total power requirements needed to run the appliances you selected to have operational during a power outage.


Friday, February 22, 2013

East Bay Gas Lines Danville - How to Light Your Furnace Pilot Light


When I first moved into this old apartment, I was surprised to see an enormous, old-fashioned furnace taking up a big part of the room. I'd never seen anything like it and certainly didn't know how to turn it on.

Now that I know how to light the pilot light of my Warm Manning furnace, it's a piece of cake. Here's how to do it.

First, locate where the furnace's pilot light is and where the gas on-off valve is. For my furnace, the pilot light is inside a little door located on the front, and the gas valve is inside a door on the side of the furnace.

The gas valve should be off, so push it down and turn it to the pilot setting (a 90 degree left turn for my furnace). While holding the gas valve down, strike a match and light the pilot light. The pilot flame should start burning. Keep holding the gas valve down for about 30 seconds.

Then, turn the gas valve all the way on (another 90 degree left turn for my furnace). The pilot light should light the rest of the furnace. If the pilot flame won't stay lit, try the whole procedure again. If it still doesn't work, you might have a clog. Try turning the gas off and cleaning out the pilot light opening with a thin wire. If this doesn't work, you might have to call an expert to help you out.

With luck, your gas furnace should be lit. You can then use the knob on the top of the furnace to adjust the heat. A couple warnings: when working with a gas furnace, always be alert about potential leaks. If it smells like gas, you should immediately air out the room and turn off the gas supply. Also, if your furnace is inside your living quarters like mine, instead of in the basement, be careful to keep potentially flammable objects far away.

That's all it takes to light your old gas furnace. The trick is finding the pilot light.


http://www.eastbaygaslines.com

Friday, February 8, 2013

East Bay Gas Line Repair - Gas Stove Burner Safety - East Bay Gas Lines Danville


Gas Stove Burner Safety
 

Gas stoves allow for precise heat control while cooking. In some areas of the country, gas appliances are more economical to operate. Take precautions to operate a gas stove safely. Improper operation could lead to fires, burns or carbon monoxide poisoning.

Carbon Monoxide

Any gas appliance can be a source of carbon monoxide, a dangerous gas that deprives the body of oxygen, resulting in serious injury or death. Don't use a gas stove as a source of heat, as this increases the likelihood of carbon monoxide poisoning. Make sure the stove is vented to the outside and the vent it not blocked. Install a carbon monoxide detector in homes where gas appliances, including gas stoves, are being used.


Cooking

The flame beneath a pot on the stove shouldn't extend past the sides of the pot. Use the right size pot for the burner and adjust the flame so that it doesn't flare up around the pot. Don't allow food to boil over. This could put out the flame, while still leaving the gas on, which increases the potential for a fire or explosion. Food that boils over could also block holes in the gas burner and lead to uneven cooking or difficulty lighting the burner. Don't line the stove burners with foil, as this could inhibit air flow to the burners.

Fire Hazards

Don't leave flammable materials such as dish towels near the stove. Don't set boxes, plastic dishes or items other than cooking pots on top of stove burners. Make sure you turn burners completely off after use. Don't allow pots to boil dry on the stove.

 Troubleshooting

If your stove won't light, first check that the holes around the burner aren't blocked with food or other debris. You can clean these with a piece of wire or a toothpick, though be careful not to break the toothpick off in the hole. On some stoves, the burner cover must be lined up correctly in order for the stove to light, so check this also. If the electronic igniter clicks, but doesn't work, try lighting the stove with a match. This will help burn off debris blocking the igniter.

Gas Leaks

If you smell gas, first make sure all the burners are turned completely off. If they are and you still smell gas, get out of the house and go to another location and call the gas company.

Even if you don't smell gas, if you suffer from persistent headaches, fatigue, nausea, dizziness or flu-like symptoms---especially if you feel better away from home---you may be suffering from carbon monoxide poisoning. Leave the house and contact the gas company to inspect the stove.

source: http://www.livestrong.com/article/138662-gas-stove-burner-safety/
by Cynthia Myers


www.eastbaygaslines.com

Friday, January 18, 2013

East Bay Gas Lines - Water Heater Safety is often taken for Granted


Water heaters are often taken for granted. They sit in our garage or utility closet and perform their assigned duty day in and day out. If installed correctly they will operate with little fuss for many years. Most of us rarely give the water heater a second thought, but they have a life cycle just like every other component or appliance in your house.

At the very minimum you should take a careful look at your water heater at least once a year. One of the most common points of failure is at the top of your water heater where it connects to the house plumbing. If the water heater was not installed with proper dielectric connectors, you will get corrosion where the copper plumbing meets the steel tank. Corrosion at water heater this area is often difficult to see. A tank can be five feet tall and when properly installed on an 18 inch platform, the top of the tank is 6-1/2 feet off the ground. This area can easily be over looked.

If you see heavy rust in this area, your tank is ready to leak. remember that your plumbing system is under pressure 24 hours a day. It doesn’t take much corrosion to eat through the plumbing. Even a small leak can flood your house. Even if your water heater is in your garage, a leak can find its way to the interior of your house. Water often sprays out of a small breach in the plumbing with such force that it quickly destroys the drywall, and gets inside the walls, and into your house. Just a small amount of water can destroy wood flooring, baseboards, carpeting, furniture, or personal items that are sitting on the floor.

Rusty water heater piping can cause leaks

In addition to looking for corrosion, look for evidence of soot at the exterior of the tank. This can be found around the burner compartment cover at the bottom of your water heater. If you are comfortable doing so, open the cover and look inside the compartment. Be careful of hot parts. If the water heater is on the inner cover will be hot. Once you remove the inner cover look for scale and rust inside the burner compartment. Old, damaged parts in the burner compartment can cause the water heater to remain on and over heat. This is a major cause of house fires.

Proper venting is critical to the safe operation of a water heater. Check the flue. It should be properly aligned with the top of the tank. And the sections of the flue should be well seated. Do not use duct tape on the flue. It can catch fire. An improperly installed flue can allow Carbon Monoxide to leak into your living space.
A general rule of thumb is to proactively replace your water heater when it has reached the end of its warranty period. That usually means that if your water heater is more than 7 years old, it should be replaced before you have problems with it. The price of a water heater is usually less than your insurance deductible. When in doubt, have your water heater inspected by a licensed plumber. It does not cost much and could save your family from injury, and you home from damage.

source: http://sdinspections.com/tag/water-heater-safety

http://www.eastbaygaslines.com

Friday, January 11, 2013

East Bay Gas Lines - Upgrade and Save Energy with Fireplace Inserts


Upgrade and Save Energy with Fireplace Inserts

Adding an insert is a smart investment that's pure win-win—it'll keep you warm and slash your heating bills all at once


According to the National Association of Home Builders, fireplaces rank among the top three features desired by new homebuyers. Unfortunately, fireplaces are also major air gaps—they can send up to 8 percent of valuable furnace-heated air flying out the chimney, making them really fun to look at but inefficient as heating sources. Here's the good news: You can transform your firebox into an efficient room heater by adding an insert.

An insert, installed by a factory-trained professional (to ensure proper venting and best efficiency results), will draft-proof an open fireplace while the unit's shell keeps heat in the room and away from the masonry. The cost can can set you back about $2,000 to $4,000 (pro install included), depending on the state of your existing chimney (does it need relining?) and the model you select. But this investment pays for itself by slashing those monthly heating bills. 

 
Upgrade and Save Energy with Fireplace Inserts
Adding an insert is a smart investment that's pure win-win—it'll keep you warm and slash your heating bills all at once
Pacific Energy Super Insert

 pacific energy fireplace insert

This redesign of the popular wood-burning "Pacific" model now has a more refined look and can fit into smaller fireplace openings. The unit features an airwash system to keep its heat-conducting ceramic glass clear and one-touch adjustable temperature control. Variable speed blower included, to easily heat up to 2,000 square feet. Available in one- or two-door styles with gold, nickel, or metallic trim.


Lennox Ravenna Elite Series Gas Insert
lennox gas fireplace insert
 

This unit is will fit most factory-built and masonry fireplaces and features a realistic dancing flame over a log set cast from real wood. Blower delivers heating for up to 2,000 square feet via optional wireless remote thermostat control. Available in a variety of face options and inset designs. 


Enviro EF3Bi Pellet Insert

 Enviro Pellet fireplace insert

This model delivers the most heat in the Enviro pellet insert line of product, quickly heating up to 1,800 square feet. It features an ignitor, easy-clean ports, and a three-piece glass bay door for optimal flame-watching. Feed the hopper with renewable recycled wood wastes, dried corn, or another readily available economical source for your area.


QuadraFire Mt. Vernon Pellet Insert

 quadrafire pellet fireplace insert

This extra-large unit comes standard with comfort-quiet blowers to heat up to 3,800 square feet. Like other pellet models, it runs on biofuels, including wood pellets, corn, sunflower seeds, and wheat. Other features include a firepot auto-clean system, programmable thermostat wall control, and auto lighting and operation programs for different fuels.
 
source - This Old House online
by Tabitha Sukhai
 

Friday, January 4, 2013

East Bay Gas Lines Danville - Water Heater Safety 101


Water Heater Safety 101

Your water heater may look benigh, but if improperly handled, it could erupt


water heating
photo by Eddie Berman


Your gas water heater might look benign, but if it's improperly installed or maintained it's a potential ballistic missile that could erupt with enough force to lift your house off its foundation. Every year a few water heaters explode with devastating results. To make sure yours is safe, follow these simple steps:

Remove paper, accumulated dust or other combustibles from the heater enclosure.

Extinguish the pilot light before using flammable liquids or setting off aerosol bug bombs near the unit. Never store combustibles close by.

If the device is in the garage, raise it so the pilot light is 18 in. above the floor. This can help prevent ignition of gasoline vapors that collect near the floor.

Inspect the flue for breaks or gaps that could leak deadly exhaust gas. (This is a good practice to do on other gas appliances.)

Ask your service technician to check the temperature pressure-relief valve, a faucet-like device mounted on the top or side of the heater. Excessively high temperature or pressure causes this valve to open, relieving pressure and preventing a steam explosion.

Consider installing an automatic gas-shutoff valve (below) that stops the flow of gas if the ground moves or if gas flow increases dramatically. The valve, which costs around $300, prevents fires when a gas line breaks due to flood, earthquake or other disaster. Some utility companies will install one and let you pay it off monthly.
by Leland Stone


Friday, December 14, 2012

East Bay Gas Lines Danville - All About Gas Fireplaces


a Craftsman-style gas fireplace from Majestic Products


There's only one thing better than a roaring fire on a wintry night: a roaring fire that needs no tending, requires minimal cleanup, and doesn't leave the rest of the house freezing cold. That's what you get with today's gas fireplaces. Long gone are the anemic blue flames and unconvincing "logs." Modern versions burn much more realistically, with glowing red embers and tall orange-yellow flames that dance and flicker around ceramic-fiber logs molded from the real thing.

Gas fireplaces come in three types: inserts, for folks who want to retrofit a wood-burning firebox with something more convenient and efficient; built-ins, for those who want a fireplace where there isn't one now; and log sets, basic burners that sit in existing, open fireplaces. Both inserts and built-in fireplaces are reliable heat producers, filling your room with a mix of warm air and radiant heat. Log sets are usually more for looks than warmth. With each type, you have a choice between models that vent the flames' fumes outside or vent-free versions that discharge all their heat, and exhaust, into the house. 


How much do they cost?
Expect to pay $2,000 to $5,000 (including installation) for a heat-producing insert or built-in fireplace. Decorative log sets run about $400 to $1,000.

Natural gas or propane?
Gas fireplaces can burn either type. Natural gas is less expensive and produces about 5 percent more heat. Choose propane where natural gas isn't available.

DIY or hire a pro?
For the safest, most efficient, and best-looking installation, leave the work to a local National Fireplace Institute-certified technician.

How much care?
For about $150, have your certified technician come once a year to clean and adjust the burner, ensuring that you have realistic, soot-free flames.

How many Btus?
A gas fireplace's heat output, in Btus, should match your room size, climate, and your house's insulation level.

Why Choose Gas?
two women pouring juice at a table next to a gas fireplace
 

Wood-burning fireplaces provide great ambience, but they can't beat the easy, no-fuss efficiency of gas.

• You don't have to split, stack, season, or haul logs.
• There are no ashes to bag, no smoky smells, no chimney to clean.
• You can start, adjust, and snuff out fires with the touch of a remote control.
• The fire needs no tending and won't die out from neglect.
• A wall thermostat can control the flame size—and therefore heat output—to maintain a specific temperature setting in the room.
• The fixed glass panels covering direct-vent fireboxes ensure that the furnace- or boiler-heated air in the rest of the house doesn't escape up the flue, as it does with a wood fire.
• You can get as much as 75 to 99 percent of a fuel's energy back as heat, instead of the 10 to 30 percent for wood fires.
• Gas fireplaces can go almost anywhere—in an upstairs bathroom, in a basement, or outdoors—without needing a chimney.

What to look for-
woman lying on a thick shag rug with a laptop in front of a gas fireplace

These upgrades enhance a fireplace's convenience, comfort, and good looks.

1. Variable-flame height adjustment. Allows you to dial in just the amount of heat you need, from a whisper of a flame to a roaring fire. (The best units adjust down to 30 percent of full output).

2. Wall-thermostat control. Automatically adjusts the fireplace's heat output to the temperature that you set manually or with a handheld remote.

3. Electronic ignition. Eliminates the need for a pilot light, saving up to $10 a month in fuel.

4. LED accent lighting. Adds a realistic flickering effect inside the firebox.

5. Battery backup. Ensures the fireplace will light during a power outage.

6. Built-in fan. Pulls indoor air into the space behind the firebox and pumps hot air out, heating a room in a hurry.

How Much Fire Power Do You Need?

 map of USA showing BTU zones and equation for figuring out BTUs needed

Gas fireplaces have a wide range of heat output, from about 7,000 to 60,000 Btus. Use this formula to determine which models generate enough heat to warm your room. The formula assumes that your house is well insulated and has tight windows, and that you like the temperature set at 72 degrees F.

By JOSH GARSKOFTHIS OLD HOUSE MAGAZINE

Source: http://www.thisoldhouse.com/toh/photos/0,,20431996_20859244,00.html

Friday, December 7, 2012

East Bay Gas Lines Danville - Winter Gas Saving Tips


A few small changes can add up to a whole lot of savings. Use PGE’s online Progress Tracker to keep track of your gas usage. Reduce your gas usage throughout December and January and you could get up to a 20% bonus credit on your PG&E bill.

See below for a whole range of ways to lower your gas costs in the “tips” section below.

·         Lower the thermostat by 1° F (if it’s set between 60° and 70°F) and you can save as much as 5 % on heating costs.

·         In the winter, open your window coverings on sunny days to help warm the rooms.

·         Save on heating costs. Keeping your thermostat set at 68Âş F during the daytime and 55Âş F at night can reduce your heating costs by up to 20%.

·         Dishwashers with booster heaters will let you lower the water temperature on your water heater, resulting in energy savings.

·         Wrap older water heaters with an insulating jacket to minimize excess heat loss. And, don’t forget to leave the air intake vent uncovered when insulating a gas water heater. Savings of up to 10% can be achieved on water heating costs.

·         In the winter, reverse your ceiling fan motor to produce an updraft that forces warm air near the ceiling down into your working space.

·         Properly sealing and insulating your business can save you up to 20% on heating costs

·         Replacing your old windows with high-efficiency ENERGY STAR® windows can reduce your heating and cooling costs by up to 15%

·         Have a licensed HVAC contractor check your central heating/cooling duct system for leaks. Sealing and insulating ducts can improve the efficiency of your heating system by as much as 20% — and sometimes much more.

·         Replace your pre-1977 gas furnace (probably 50-60 percent efficient) with the most efficient model and you could cut your natural gas use by up to 33%.


source: http://www.pge.com/myhome/saveenergymoney/wintersavings/

Thursday, November 15, 2012

East Bay Gas Lines - YOU'RE ALWAYS COMFORTABLE WITH NATURAL GAS RANGES & COOKTOPS... - East Bay Gas Lines Danville


YOU'RE ALWAYS COMFORTABLE WITH
NATURAL GAS RANGES & COOKTOPS...


Nothing compares with natural gas for cooking. There's a wide selection of natural gas cooktops, ovens and ranges with all kinds of special features for cooking convenience. And, you can cook even when the electricity goes out, since you can light the cooktop burners with a match if needed. Consider all the benefits and it's no wonder most professional American chefs prefer natural gas.
Whether you need a cooktop or range, there's a natural gas unit to fit perfectly with your kitchen plan. Free-standing ranges come in a variety of sizes, including apartment-size, and offer a variety of options including combination oven/broiler, cooking surfaces with four to six burners, and the ability to convert burners to a griddle, grill or work surface. These options are also available in the slide-in ranges. Slide-in ranges are available in several widths.
Superior natural gas features mean superior results!
  • Maximum heat in an instant
  • Instant cool-down - cooking stops the instant you turn off the natural gas flame, unlike an electric element that keeps cooking as it cools down.
  • Precise temperature control
  • Greater cooktop flexibility, since the adjustable flame makes every burner suitable for any pan size and any type of cooking that is being done
  • Faster, more even cooking with the open flame
  • Easy clean-up, since all grates, knobs and burners are dishwasher safe
  • Optional sealed-surface cooktops for easy cleaning
  • Clean, smoke-free broiling
  • Pilotless ignition
  • Automatic igniters instead of standing pilots for higher efficiency
  • Cooktop burners that can be lit with a match, so you can cook even when electricity goes out.
Cooking with natural gas is more economical - in fact, it costs about half as much as cooking with electricity. You'll enjoy long-term saving built in to natural gas cooking appliances, such as extra insulation which makes self-cleaning ovens more energy efficient and pilotless ignition systems that uses 40 percent less natural gas for cooking than older models with standing pilots. And, natural gas cooktops and grates are built to last, with fewer parts to fail than electric appliances.

source:  http://www.okaloosagas.com/cooking.aspx


http://www.eastbaygaslines.com

Wednesday, October 17, 2012

East Bay Gas Lines Danville - How a Gas Log Safety Pilot Works


How does a gas log safety pilot work?
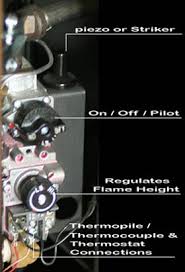
Aside from the electronic ignition systems, the basic premise for the safety pilots used on gas logs is the same as those used for decades with wall heaters, hot water heaters, and nameless other gas appliances.

How do you light a gas log safety pilot?
You turn the control knob to the pilot position, push the knob in, light the pilot with a match, then hold the knob down for 30 seconds or so until the pilot stays lit by itself. Once the pilot light will stay lit on its own, you can then move the knob to the "On" position. For manually operated gas logs such as the one pictured to the right, this will turn the logs on. For remote controlled gas logs, this will put the valve in the necessary position for the remote control to actuate the burner.

What if the pilot will not stay lit?
If you cannot get the pilot to light at all, meaning you hold the button down in the pilot position and hold a match up to the pilot and nothing happens, then either the valve is bad or something is abstructing the gas from coming into or going through the valve. If you can get the pilot to light with a match, but it will not stay lit on its own after holding down the knob for 30 seconds, then put the knob back into the off position, wait 5 minutes and try again. If it still will not light, then something is definately wrong and you should have a professional check it out. This page is not meant to be a trouble-shooting guide for gas logs, but in general, if you cannot get your safety pilot to stay lit, It could be that the pilot flame needs adjustment, the thermocouple has gone bad and needs to be replaced, the entire valve has overheated and must be replaced, or something is abstructing the gas line. In any case, it is probably time to seek the assistance of a professional. Any plumber or heating and air conditioning service man who deals with gas appliances with a safety pilot should be able to help you.

How does a safety pilot actually work?
Although most of us have learned how to light one of these things at some time or other, few of us have any idea as to how this ingenious little safety system actually works.
So here is a brief, but hopefully useful explanation of how gas log safety pilots work so you can decide if it is something that you want or need. You may also find this information helpful for any other device that has a similar safety pilot.

Gas Logs that have a safety pilot have a valve body that is attached directly to the burner. This valve body that has 2 separate valves inside that control the gas: The valve to the main burner and the valve to the pilot flame. When the pilot is lit, the flame directly hits what is called a thermocouple (or thermopile). The thermocouple is the ingenious device that makes the whole system work. The physical properties of the thermocouple are such that it actually generates electricity when there is a great enough difference in temparature between the tip of the thermocouple and the base. If the pilot flame is too hot, then the entire thermocouple gets hot and there is not enough temperature difference to create a current. If the pilot flame is too low or not coming into direct contact with the thermocouple (or simply blown out), then there is not enough heat to generate a current. This is why the proper adjustment of the pilot flame is necessary for gas appliances that have a safety pilot.
Now, on to how the pilot system works. The electricity from the thermocouple is used to power an electromagnet that holds the pilot valve open, thus allowing the pilot to stay lit by itself. The amount of electricity needed must be within a certain range of millivolts in order for this to happen. If there is not enough electricity (or no electricity) being generated, then the electromagnet no longer functions and the pilot valve shuts. When you turn the knob to the pilot position and push it in, you are in fact manually opening the valve to the pilot flame. Once the pilot gets the thermocouple hot enough, the electromagnet engages and keeps the valve open. This is why you need to keep the knob depressed for about 30 seconds.

After the pilot is lit and stays lit on its own after releasing the pilot know, you can then turn the knob to the "ON" position. With manually operated safety pilots, turning the knob to the on position will light the logs and you can adjust the flame height using the control knob. With remote controlled systems, turning the knob to the on position simply puts the main valve in a position to be opened and closed buy whatever means the remote control uses. In the case of a remote controlled valve, some will have a battery operated device that opens and closes the valve to the main burner, thus turning the logs on and off. More sophisticated systems (called variable flame remotes) will have a battery operated motor attached to the flame adjustment knob that will allow you to adjust the flame height as well.

The main burner valve is designed such that if the pilot valve is closed, no gas can flow through the main valve, even if you have it in the on position. So as long as the pilot light is on and heating the thermocouple properly, the system is operational and gas can then be allowed to pass through the main burner valve. If the pilot light gets turned off or blown out (or in some cases gets too hot), then all valves are closed and no gas can pass through the system.

When the main burner is turned on, either by a remote controlled unit or by manually turning a knob, gas flows through the main valve and comes out the holes in the burner. The flame from the safety pilot is positioned just above the first several holes in the main burner, so when gas flows out of the main burner and reaches the safety pilot, it automatically ignites.

So again, if the safety pilot is not lit (or for some reason the safety pilot gets blown out), the system automatically closes both valves so that no gas will flow through either valve until the safety pilot is re-lit. This prevents the system from allowing gas to flow freely into your home at any time in the event that the safety pilot blows out, or someone turns on the gas to your fireplace without lighting it.

 source: http://www.hansenwholesale.com/gas-logs/how-safety-pilot-works.asp

http://www.eastbaygaslines.com

Thursday, August 9, 2012

East Bay Gas Repair - Portable Firepit Versus Built-In Fireplace - East Bay Gas Lines Danville

Portable Firepit Versus Built-In Fireplace

How to choose which fire feature is right for your needs


You built your patio to extend your living space beyond the walls of your home. You created an enticing outdoor room or two with furniture cozy enough to suit your living room but durable enough to withstand the elements. Maybe you're constructing an outdoor kitchen that goes beyond a simple charcoal grill. And, of course, you have plants.
Still looking to spice up your outdoor life? Whether your backyard dreams involve bundling up for a chat with a couple of close confidantes, nestled on a cushioned outdoor love seat, or invite the whole gang over for s'mores and ghost stories, the solution is the same: Just add fire.

Here are a couple of options:
fire pit with chairs around it

Portable Fire Pit If you're looking for design flexibility, you could be moved - so to speak - by a portable, standalone fire pit. These models offer a sort of a campfire feel. Because you can place them anywhere, they offer 360-degree access, which makes them perfect for group gatherings. Which enables maximum conviviality, extra-loud "Kumbaya" singing and an unlimited number of people who can get their marshmallow-roasting sticks into the mix!
Standalone fire pits may not have the anchored, homey appeal of a built-in fireplace or fire pit, but that doesn't mean they can't be elegant in their own right. You can get them in industrial-style metal, mesh, stone or even polished copper for a look that suits you. Some higher-end fire pit models are powered by a natural gas source, but most use wood for fuel.
Bonus: the convenience factor. The ability to move the unit easily means it'll be less of a hassle to clean, with the added bonus of being able to experiment freely with your backyard's feng shui.

built-in fireplace

Built-In Fireplace If you're feeling a bit more attached to your outdoor design, a built-in fireplace might fit the bill. Fireplaces create an intimate hearth feeling and can invite lively (yet civilized!) conversation among a small group of people.
One advantage to built-in fireplaces is that they're protected from the elements - namely wind, which can kick up embers and shift the direction of the smoke - and direct smoke upward and away from your guests' faces. That protection will also make it much easier to light.
As far as materials go, you'll be building out your fireplace in a material that matches or coordinates with the other materials in your outdoor space: brick, stone, marble, tile, you name it. Aesthetically, the sky's the limit. Some are wood fueled, and others are hooked into your home's natural gas line just like any indoor fireplace would be.
Built-in fireplaces definitely offer an extra boost of aesthetic appeal that a free-standing fire pit won't. Installing one will also add value to your outdoor living space if you keep it in top shape; that kind of high-end extension to your indoors makes the patio livable for more months out of the year and adds that high-end je ne sais quoi. (Translation: lots of appeal to potential homebuyers.)
But before you go worrying about what the future owners of your current home will think, just focus on enjoying the bright flame in your backyard, regardless of the season.

source: By Chris Heiler, garden designer and LandscapingNetwork.com columnist

http://www.eastbaygaslines.com

Wednesday, August 8, 2012

Gas Line Repair Danville - Fire Pits Design ideas for outdoor fire pits - East Bay Gas Lines Danville

Propane Fire Pits

stone fire pit
Zaremba and Company Landscape in Davisburg, MI
 
Adding a fire pit as part of your landscaping will extend the enjoyment of your backyard for you and your guests. They provide warmth, light, a cooking source, and ambiance, making them a natural gathering spot for socializing, entertaining, and relaxation. People are drawn to the campfire-like atmosphere, and before you know it, there will be story-telling and laughter. A fire pit can also serve as an important focal point in your outdoor landscape design. When placed where it can be easily seen from your interior living space, it can be enjoyed from the indoors as well.
There are many options when it comes to the size, shape and style of a fire pit. You can have a built-in fire pit installed, or you can purchase a portable one that can be moved about your yard. If opting for a built-in fire pit, you'll be able to choose from a variety of outdoor finishing materials including concrete, stone and brick. And remember, fire pits don't have to be round-they can be square, L-shaped, triangular, or an entirely custom shape.

Get these tipsIn this section, you'll find tips from landscaping professionals on:
  • Choosing the best fire pit type for your needs (built-in, prefab or portable).
  • How to size your fire pit based on how much space is available, how many guests you expect to entertain, and the height and arrangement of your outdoor seating.
  • The differences between a fire pit and an outdoor fireplace, along with a chart that can help you evaluate the most suitable choice for your outdoor living space.
  • Weighing the pros and cons of the various fire pit fuel options, including gas, propane, wood and ethanol.
  • Determining the best location for your fire pit, considering factors such as convenience, space availability and safety.
  • Determining the best size for your fire pit, depending on how many people you plan to accommodate and the room you'll need for outdoor seating and unrestricted traffic flow.
  • How local building codes may impact where you can locate your fire pit as well as when you can use it and what types of wood you can burn.
  • The cost ranges for various types of fire pits and how to choose the right style for your budget.
  • Selecting a facing material for your fire pit that ties in with your patio and the materials on the exterior of your home.
  • Choosing fire pit fill materials that are both decorative and heat absorbent, such as lava rock, river rock and recycled glass.
  • How fuel costs will impact the overall cost of operating your fire pit.
Because of the vast array of fire pit designs available, and the importance of choosing the appropriate size and location for your fire pit, be sure to consult with a landscape designer for advice and guidance.

source: By Sarah Tate, LandscapingNetwork.com Columnist

http://www.eastbaygaslines.com

Wednesday, July 25, 2012

East Bay Gas Lines Danville - How Gas Outdoor Lighting Can Spark Interest In Your Outdoor Lighting

How Gas Outdoor Lighting Can Spark Interest In Your Outdoor Lighting


gas outdoor lighting

What makes gas outdoor lighting so special?

You don't have to be an expert in lighting to know that gas lighting has virtually disappeared from the extensive menu of outdoor lighting fixtures available on the market today.
The main reason why this shift took place was the invention of electricity.Since then, the advancements in outdoor lighting technology has brought us much more efficient outdoor lamps.
The more recent advancements in clean energy has propelled the lighting industry to introduce even more energy efficient lamps than ever before.
While this race for creating the cheapest most energy efficient lighting available continues, we never take time to look at the beautiful alternatives that gas outdoor lighting gives us.
Many antique outdoor lighting fixtures are modeled after these old gas outdoor lighting fixtures. The classical beauty built into these fixtures still draws people to them.
If you want your outdoor lighting to stand out amongst the crowd, consider an outdoor gas lantern. Where else could you find such a beautiful fixture?


Gas Lighting Safety
Before working with gas lighting there are some safety precautions you must take.
If you have young children you may want to plan ahead and make sure the gas lanterns are out of their reach. Their safety always comes first and you don't want them ever exposed to an open flame.
When installing outdoor lighting always plan ahead. Always install gas light fixtures far away from anything flammable. It's best to install them on a concrete surface where there is nothing else around that could potentially catch fire.
Have a fire extinguisher handy at all times. We shouldn't need to discuss this further since you should always have a fully functional fire extinguisher in your home for safety reasons.


Available Lanterns To Choose From
The hardest part about choosing the right outdoor lighting fixtures will be deciding between the endless styles available. Once you've gotten that covered you're 95% of the way there.
Gas lanterns can be found in basically 3 types. Hanging lanterns, post mount lanterns, and wall mount lanterns. At this point you've probably figured out what each one of these lanterns does so I won't bore you with the details.


Portable Gas Outdoor Lanterns
Sometimes you need to take your outdoor lighting with you but a really long extension cord just won't work. Gas outdoor lighting is a portable solution to your outdoor lighting needs.
Portable propane lanterns use propane gas to create light. The propane gas burns and creates a bright light as it slowly burns out the replaceable filament.
Portable gas outdoor lanterns are an excellent source of light whenever electricity is not available. Take it on your next camping trip or use it for your next outdoor venue.
If you do, remember to bring extra propane tanks with you so you don't run out of light too early.
Gas lanterns are fully dimmable. With the turn of a knob you control the amount of gas released into the fillament, increasing or decreasing the lantern's light output.
The convenience of portable gas outdoor lamps gives you the freedom that outdoor lighting provides even if an electrical outlet is nowhere to be found.

source: http://www.creative-outdoor-lighting.com/gas-outdoor-lighting.html

http://eastbaygaslines.com